Saturday, August 2, 2014

Our Revamped Kitchen

So, I've had this post in my queue for weeks now, and didn't realize that I (1) never finished it, and (2) never posted it. Enjoy!


It's done! It's finally freaking done... our kitchen nightmare is over. As you may remember, back in October we had a little "incident" with a bad dishwasher installation by Home Depot. They never tightened the water line running into the dishwasher, so it proceeded to leak into our cabinets for two weeks. They were the worst company I've ever had to deal with in terms of insurance claims (which is saying a lot since I work in insurance for a living), and then tried to wash their hands of the whole situation. Long story short, we won't spend a dime at Home Depot ever again.

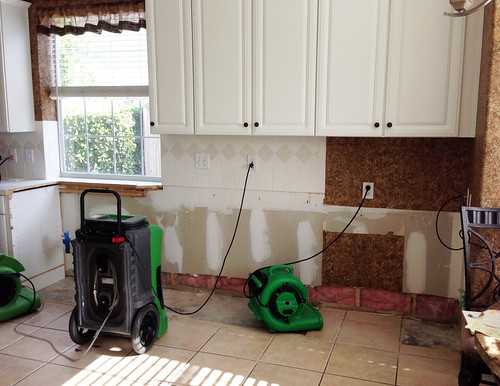
This is what we were left with, shortly after the incident:


Since part of our cabinets were torn out, and our countertop was cut in half, pretty much everything below the upper cabinets had to go throughout the kitchen. It was a long process, not helped by the fact that it took us about 6 months to finally decide on backsplash tile, but I digress... It's done, and I'm thrilled.

Here's a quick rundown of what was changed from our original kitchen:
-New base cabinets, and some upper doors converted to glass front
-Painted base cabinets
-New granite countertop
-New sink and fixtures
-New dishwasher, stovetop, and microwave
-New tile backsplash
-New light fixture over table, since old no longer matched everything

All that, because someone didn't check a water line before finishing their install. The only original parts of our kitchen that remain are the wallpaper (which I actually like), the floor, and the upper cabinets. We still have our original white fridge and double ovens, but they're on the list of things to switch as soon as possible. Save the most expensive appliances for last, right?

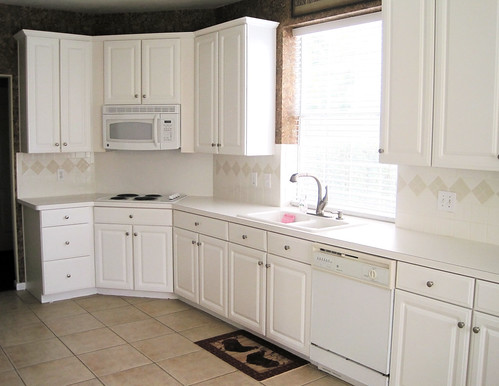
So, here it is... time for the big reveal! This is what our kitchen looked like when we first moved in, back in 2011:


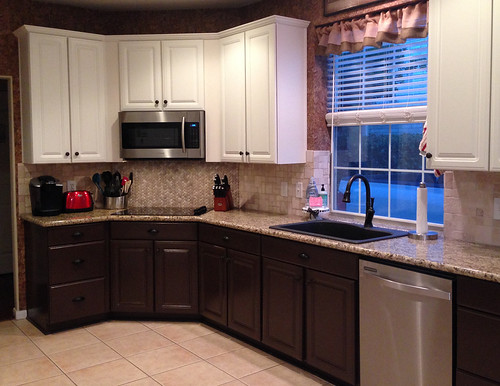
And here it is now, almost 3 years later, after our partial renovation:


I'm in love. Seriously. It made such a massive difference in our entire downstairs, that I question how I even lived with the all-white kitchen in the first place. Also, when was that in style?! Our house, back in the mid-90's, was the model home for our development. However, our kitchen had white linoleum countertops and a sea of white cabinets and appliances. Was that really the "in" thing back then? *shudders*

Anyway, it's much better now, and I'm so happy with how it turned out.

Saturday, June 21, 2014

Running

I was never a runner. To be honest, I'm still not. When I think of a runner, I think of someone who can run a 5K as a warmup, and then follow up with a briskly paced marathon. I am not that person.

Up until a couple of months ago, I couldn't run more than a few steps... and it was only in situations where my life depended on it. Not that I was ever in a life-threatening running scenario, but if I had been, I'd most likely have been dead where I stood.

I was a lazy 30-something. I failed to acknowledge that my metabolism from my 20's was slowing down, and that vacuuming and walking up one flight of stairs at the office weren't really adequate workouts. I could see in photos of myself that I was getting heavier. Then I started having mornings where I couldn't find anything to wear because nothing fit. Then I stepped on the scale...

...then I decided to run.

I downloaded some running apps, including a Couch to 5K one. I scanned through the various training runs over the 8-week span of the app and laughed to myself about how that is totally not going to ever happen for me. Run for a full 5 minute interval? Ha! Yeah, okay. I'll be lucky to not break a sweat tying my shoes.

It was a slow start. I aggravated an old injury in my knee pretty badly in the beginning, and had to rest it for what seemed like an eternity. After some recuperation, and getting fit for proper running shoes at Luke's Locker, I was back at it. I learned that I have Achilles' tendons that get really angry when I run, so my progress through the C25K app has been slow. I try to run every third day, giving my pathetically weak body two days rest in-between.

I've finally reached week 6 of 8, and this morning I did something I never in a million years thought I'd ever be able to do. I got up and ran 2 full miles without even stopping to walk. Two. Full. Miles. That might not seem like a huge accomplishment, but remember, I was never a runner. I was the girl who deserved a medal for the excuses I came up with to get out of running a mile during physical fitness testing in school.

And you know what? I enjoyed it. When I loaded up my app and saw "Run 2 miles (or 20 minutes)" I may have panicked and had a moment of "Oh yeah right," but I did it. I freaking did it. Sure, each mile took me 11 minutes to run, which I'm sure is laughable to most runners, but for me it was a huge accomplishment.

Did I also mention that in addition to my satisfying sense of achievement I also have jeans that I can no longer wear because they're too large? ...because I totally do. I can also fit into my "skinny" jeans, but they're also quickly heading towards the "too big" pile in my closet. In addition, my thyroid meds that kept getting increased to higher and higher dosages? They've been reduced twice, since my body actually has it's own metabolism again. Take that, every doctor who told me that exercise wouldn't make a difference with my thyroid disease.

So what's the point of this post? I don't really know. I kind of wanted to just pat myself on the back for what I've accomplished so far. My goal is to run a 5K without dying before reaching the finish line, so I still have a ways to go, but I'm getting there. So if you're reading this and thinking, "Yeah, that's great, but there is NO way I could ever do it," guess what? You can. If I can get my ass up off of the couch and go for a run, anyone can. No matter how slow and pathetic you feel when you start out, keep going. Always, keep going.

Thursday, May 29, 2014

David's Tea

 
I have to quickly post about my newfound obsession... David's Tea. My dear friend Amie, who runs Off-Beat Charm, turned me on to these teas and now I can't stop!
 
This was my first sampling of their teas. I purchased two mugs, and Amie hand-picked a lovely sampling of several tea flavors that she thought I would enjoy ...and I certainly did! I don't think there is one tea flavor, that I've tried so far, that I've disliked. My absolute favorite so far is Queen of Tarts. I liked it so much that I placed an order for more before I even finished the sample. It's tart, it's sweet, it's bright red, and it's great iced or hot.
 
I'm usually not at a loss for words when it comes to most topics, but I am with this tea. It's just good. Any flavor, any variety... it's good. Try it. I am in no way benefitting from this endorsement, I simply wanted to spread the word about David's Tea. I do plan on trying to create some tea-infused recipes, so keep this post as a mental reference for the future.
 
If you've tried David's Tea before, leave me a comment and let me know your favorite flavor!
 

Tuesday, May 27, 2014

Incredibly Simple Summer Desserts

 
Do these look complicated to you? ...because they're not. Not. At. All. For these desserts, presentation really is everything. I made my ingredients from scratch, but if you're in a rush, your ingredients don't even have to be homemade!
 
What you need:
 
  • Mason jars, with lids (I used 1 dozen of the smallish ones)
  • Your favorite sheet cake
  • Pudding, flavor of choice
  • Whipped cream
  • Fresh fruit, diced
 
What you do:
 
Slice your sheet cake in half horizontally, making it into two thin layers. With a biscuit cutter, or another mason jar, start cutting jar-sized circles into each cake layer. You will need two cake circles per jar.
 
Once circles are cut, place one cake circle at the bottom of each jar. Press it down firmly to eliminate air pockets, but do not crush it. Add layers of the remaining ingredients in this order: pudding, diced fruit, whipped cream, cake circle #2, pudding. Top with remaining diced fruit and/or whipped cream.
 
That's it! Screw those lids on, pop the jars in the fridge, and you're all set. All of the cuteness, for half of the effort.
 
Enjoy!
 

Saturday, April 19, 2014

Less isn't More

Over the past year I've taken less photos, written less blog posts, and crafted less. The craft part was due to my studio being ruined and gutted at the end of August thanks to a leak. That's been repaired, so what is the other issue? My computer...
 
To give myself some credit, I did manage to keep a PC alive for nearly 10 years. It survived multiple moves, even one across the country, and was rarely updated. Obviously, programs started failing, my photoshop didn't run smoothly, and editing pictures just sucked. It discouraged me from both taking pictures and blogging.
 
Well, that's an issue no longer. I now have this 27" beauty as part of my creative arsenal.
 
 
So, no more excuses! It's time to get back in touch with my crative side...
 

Monday, March 31, 2014

Tea Giveaway

One of my dear friends has started a lovely blog about her stories, travels, and love of tea. Currently, she is hosting a giveaway for a DAVIDsTEA perfect tea set, put together especially by her.
 
Head on over by clicking here. While you're there, stay a while and have a look around. She has some really big plans for her newfound blogging journey, so make sure to bookmark and check back often!

Saturday, March 15, 2014

Spring Cleaning Quick Tip

 
Let me start off by saying that I am in no way getting paid for this product review. J and I were wandering around The Container Store last Sunday and I came across these little plastic interlocking drawer organizers.
 
They were $5.99 so I figured it wouldn't be a huge loss if they turned out to be junk. I have a small makeup drawer in our bathroom that was in desperate need of organization, and these were actually short enough to allow the drawer to close properly. The added bonus is that you can configure them into any size, shape, and layout that your little heart desires.
 
This morning, while preheating the oven for breakfast, I figured I'd do something productive. I wound up only using about one and a half of the strips (package includes 5), so I have plenty left over for other organization projects. I also picked up a pack of the larger (ie. taller) sized ones for my dresser drawers.
 
The verdict? Totally worth the $6. These are simple to use, they break apart easily, and they are totally customizable. The only con is that they can slide around inside the drawer. This isn't an issue if you fill the entire drawer with them, but I only needed it in half of my makeup drawer so it does shift a tiny bit. All in all though, I'm happy. It was cheap, simple, and did exactly what I needed it to do!
 

Sunday, March 9, 2014

Craft Studio Renovation

We did it! Finally, after months of debate and procrastination, we buckled down and completely renovated my studio. We repaired the walls and ceiling (from our adventure in homeowners claims), painted every surface that could possibly be painted, ripped out the carpet, and replaced the flooring and trim. AND we did it all in about two days, including the time it took me to move my stuff back into the room... and I have a lot of stuff.
 
It isn't 100% completed yet, but I am absolutely thrilled with how it turned out. It is such a drastic change from the way the room was previously that it's hard to believe that the pictures are even from the same house.
 
Here is how the room looked when we first moved in, and after my stuff was set up (click for larger images):
 
Pretty boring, right? The carpet and the walls were basically the same color, which made the room look completely blah. The fan is also totally dated, and we haven't replaced it as of yet, but it is on the list of little finishing touches for the room.
 
Regardless of lack of style, the initial pictures of the studio still look infinitely better than it did after our little leak issue:
 
That was a fantastic day. Mold, water, gross stuff... fun times. Really fun times. After having everything professionally dried up and torn out, the room sat in a state of disrepair while we worked on renovations to our downstairs. Since that is our main living space, the studio and it's adjoining bathroom we're put off until last. The bathroom is next weekend's project, but I digress...
 
Back to the current studio work:


I'd also like to take this opportunity to show off the craft table that J built for me. I need to refinish the top, but it is a beast in terms of storage capabilities. Plus, it only cost a fraction of what the similar tables from Pottery Barn sell for.


And there you have it! I still need a rug, a new light fixture, and some wall decor, but the major construction work is done. I'm going for a Cape May, NJ theme with the room, since my dollhouse reminds me of the brightly colored Victorian houses there. I want some large vintage postcard prints, and I'm going to try to encorporate some very subtle beachy items into the room (rope, stripes, sand dollars, etc). I'm going to carry the theme into the adjoining bathroom as well, but it will be painted gray, instead of the blue. So stay tuned for that project because if the studio is any indication of what we can do in a weekend, we should have that bathroom done even faster!


Sunday, January 26, 2014

Goodbye brass!

The 1990's brass fixtures in our house have been the bane of my existence since we moved in. The previous owner had randomly upgraded some fixtures to stainless steel, but there was really no rhyme or reason to what was changed. The majority of the fixtures (doorknobs, lights, faucets, etc) were still brass.
 
I'm not a fan of stainless fixtures, so we have been slowly replacing everything with oil rubbed bronze. We had made a huge dent in the brass removal project, but our fireplace was an issue. It was a big, ugly, brass eyesore right in the middle of our house.
 
We discussed replacing it, or putting a screen in front of it, but I knew there had to be a way to spraypaint it. Spraypaint has become my BFF in terms of brass elimination. When I want a cheap, quick fix, I'll spray the old fixture. We changed out all of the brass in our guest bathroom this way (minus the faucet). So I knew, regardless of the heat issue, that there had to be a way to spray the brass fireplace surround.
 
I scoured Pinterest and came across this pin. Until then, I never knew that high heat spraypaint even existed. Of course, your color selection is limited, but black was exactly what I was looking for. After a trip to Lowe's I was ready to get rid of our eyesore.
 
I did exactly what the woman in that pin did... I taped, and taped, and taped some more. Then I built a little plastic spray booth around the fireplace. The only thing I did differently was not climbing inside. I left enough slack in the plastic to stick my arm inside, and then taped the plastic tightly around my bicep. In order to see inside I made another hole and secured a pair of safety glasses. I'm sure I looked incredibly ridiculous, but it worked! The house wasn't covered in paint, the surround was completely transformed, and I wasn't coated in a fine layer of black dust.
 
We took the doors off and sprayed those separately out in the garage. The paint dries extremely quickly, so we were reassembling and done with the project in no time. From start to finish it was maybe two or three hours. The most time consuming part was building my spray booth (well worth it though, trust me). One thing to note, the paint stinks. I mean, really stinks. Even with the plastic sheeting the house stunk. Luckily it was warm today so we had all of the windows open, and it aired out pretty quickly.
 
So, without further ado, the final result of my efforts:


Monday, January 13, 2014

House of Gates

Gate by the stairs. Gate by our bedroom. Move that gate over there. No wait, I need one over here. ...and we don't even have kids! I'm tired of gates. They're ugly, they're expensive, and they're leaving marks on our walls. Don't get me wrong, Ranger is a good dog, but I like to keep him out of certain areas.
 
I saw this idea on Pinterest, and knew J could tackle it. When we started all of our renovations he invested in several new tools and saws, so he's been itching for reasons to use them. Of course, we still have plenty of renovations left to finish, but sometimes you need to just step away and do something else.
 
So, I present to you, our bedroom dog gate:
 
 
I still have to stain it, but I had to share. It turned out great and it's so much better than those annoying baby gates (and a fraction of the price!).
 

Saturday, January 4, 2014

2014: [Hopefully] New Beginnings

Is it safe to come out now? Is 2013 over? What a year... I'm not one to dwell on the negatives, but sheesh. This one was rough.
 
Let's recap the more trying parts of last year:
  • My father passed away suddenly in February
  • I was in a car accident after getting hit by a woman too busy texting to pay attention
  • Our A/C drain pipe overflowed in the attic damaging four rooms
  • Our new dishwasher was improperly installed by Home Depot and ruined our kitchen
  • Scout, our corgi, passed away shortly after his 14th birthday
Written out in a list, I'm sure it doesn't seem like that much, but it's been hard... Incredibly hard. Of course, we also had positive and fun experiences last year as well. To name a few:
  • Our trip to San Antonio
  • Getting our new patio and majorly renovating our yard
  • Going on the field before the only game the Texans won this year (thanks BMW!), and then watching the game from awesome club level seats
  • J got to go to the BMW Performance Driving School in SC
  • We watched a Rockets game from court side seats, and got spoiled by club level amenities again
Granted, (to me) the negatives overshadowed a lot of the positives this year, so I've definitely been looking forward to 2014. I'm praying, and hoping, and wishing that we shake off 2013 and have a great year. Of course I know that nothing can be perfect, but a little less emotional trauma and a little more good luck would really be fantastic.